
DIY Hosting
Back in 2019, I built a WordPress website and hosted it on Bluehost. It was a good learning experience in many ways but what I didn’t learn was anything about the backend workings of how a website actually functions. This is why you pay Bluehost, to deal with all the difficult technical stuff so you can just focus on creating content. I love difficult technical stuff, and also saving money on hosting fees, so this year I decided to cancel Bluehost and try to host my website on my own.
You can actually do this for practically free. The only real expense is the actual web server. Fortunately Raspberry Pi is perfect for this. Unfortunately, in 2023, Raspberry Pis are almost impossible to get for msrp. I ended up paying a premium for one on Amazon.
Here are the steps:
Initial Raspberry Pi setup and SSH
1. Buy a Raspberry Pi 4 Model B, 64GB+ microSD card and Raspberry Pi USB-C power supply.
2. Insert the microSD card into your laptop and format it to exFAT.
3. Download the Raspberry Pi Imager from https://www.raspberrypi.com/software/ and run the installer.
4. Run the installed Raspberry Pi Imager app and choose the operating system as Raspberry Pi OS (other) and then Raspberry Pi OS Lite (64-bit).
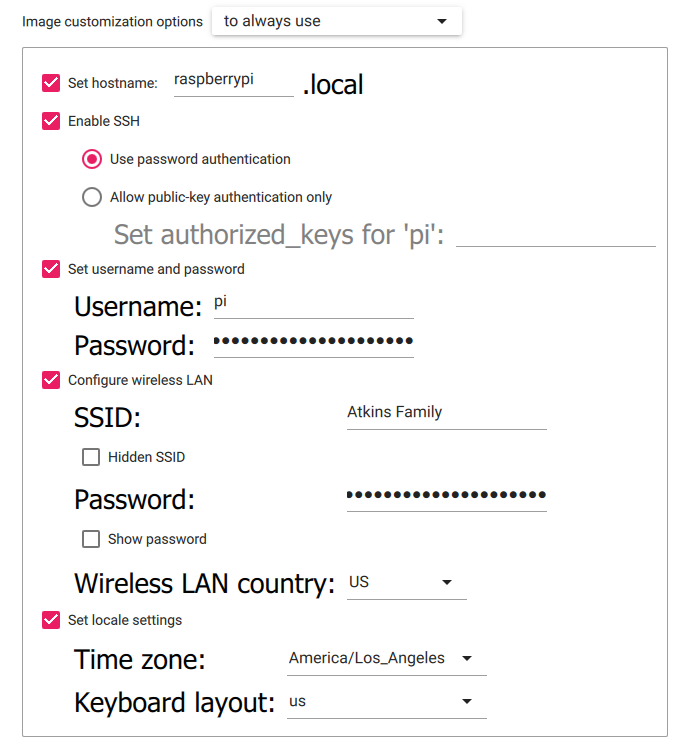
5. A gear icon will appear. Select it and configure settings as shown below. Change the default password from “raspberry” to something more secure.
6. Choose the storage as the microSD card select WRITE.
7. Eject the microSD card and insert it in the Raspberry Pi. Connect the power supply and let it boot up and automatically connect to Wi-Fi.
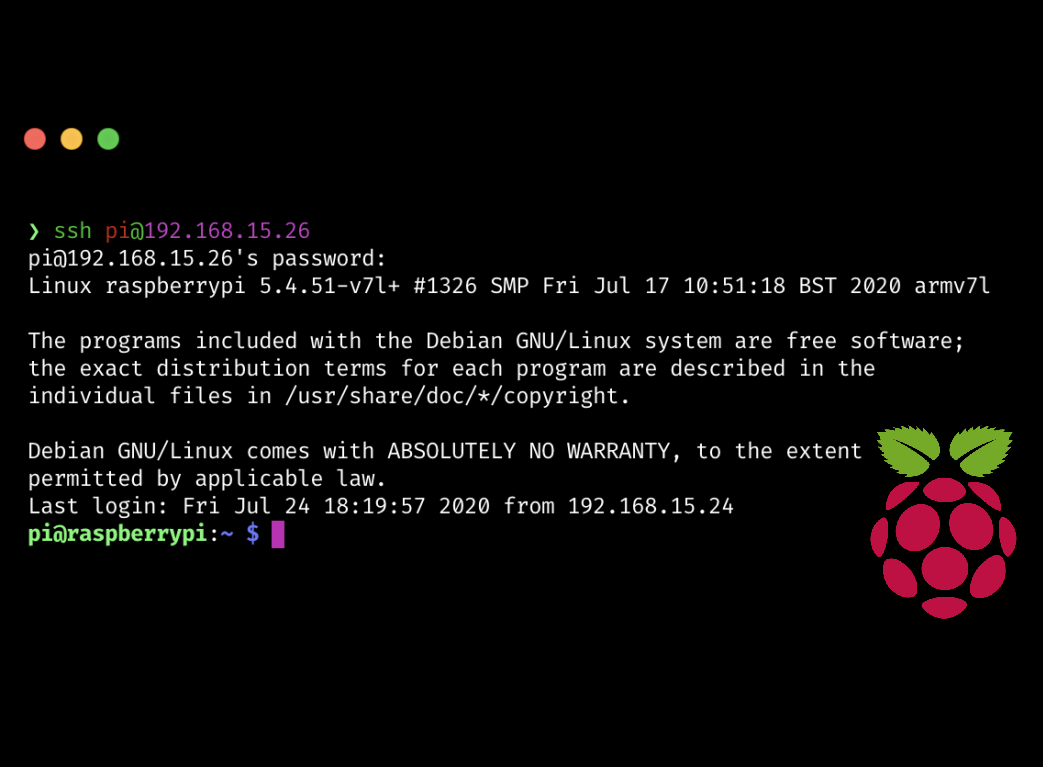
8. Open a command prompt and type ssh pi@raspberrypi. Enter the password set previously (it will not show). If you see pi@raspberrypi:~ $ then you are successfully logged into the raspberry pi.
Installing LAMP and WordPress
1. Install any updates and upgrades
sudo apt updatesudo apt upgrade2. Install the web server Apache 2
sudo apt install apache23. Install the web development scripting language PHP
sudo apt install phpsudo apt install php-mysql4. Install the SQL database MariaDB
sudo apt install mariadb-server5. Restart the web service
sudo service apache2 restart6. Change directory
cd /var/www/html7. Remove index file
sudo rm index.html8. Install WordPress
sudo wget http://wordpress.org/latest.tar.gz9. Extract file
sudo tar xzf latest.tar.gz10. Move file from wordpress directory to current html directory
sudo mv wordpress/* .11. Remove old wordpress directory and old file
sudo rm wordpresssudo rm latest.tar.gz12. Change ownership of files
sudo chown -R www-data: .13. Setup database
sudo mysql_secure_installation14. Select enter. Set a root password to something secure. Select Y to everything that follows. Sign into database
sudo mysql -u root -p15. Enter the password that was just setup. You should see the prompt MariaDB [(none)]> _ With this prompt, create a database
create database wordpress;16. Setup a user and password for the database. ‘password’ should be the database password that was just setup
GRANT ALL PRIVILEGES ON wordpress.* TO 'root'@'localhost' IDENTIFIED BY 'password';17. Flush privileges
FLUSH PRIVILEGES;18. Exit out of MariaDB prompt and back to directory with Ctrl + D. Reboot system
sudo reboot19. From the pi@raspberrypi:~ $ prompt, configure the file for permalinks
sudo a2enmod rewritesudo nano /etc/apache2/sites-available/000-default.conf20. In the nano editor that opens, paste the below html code into the config file
<Directory "/var/www/html">
    AllowOverride All
</Directory>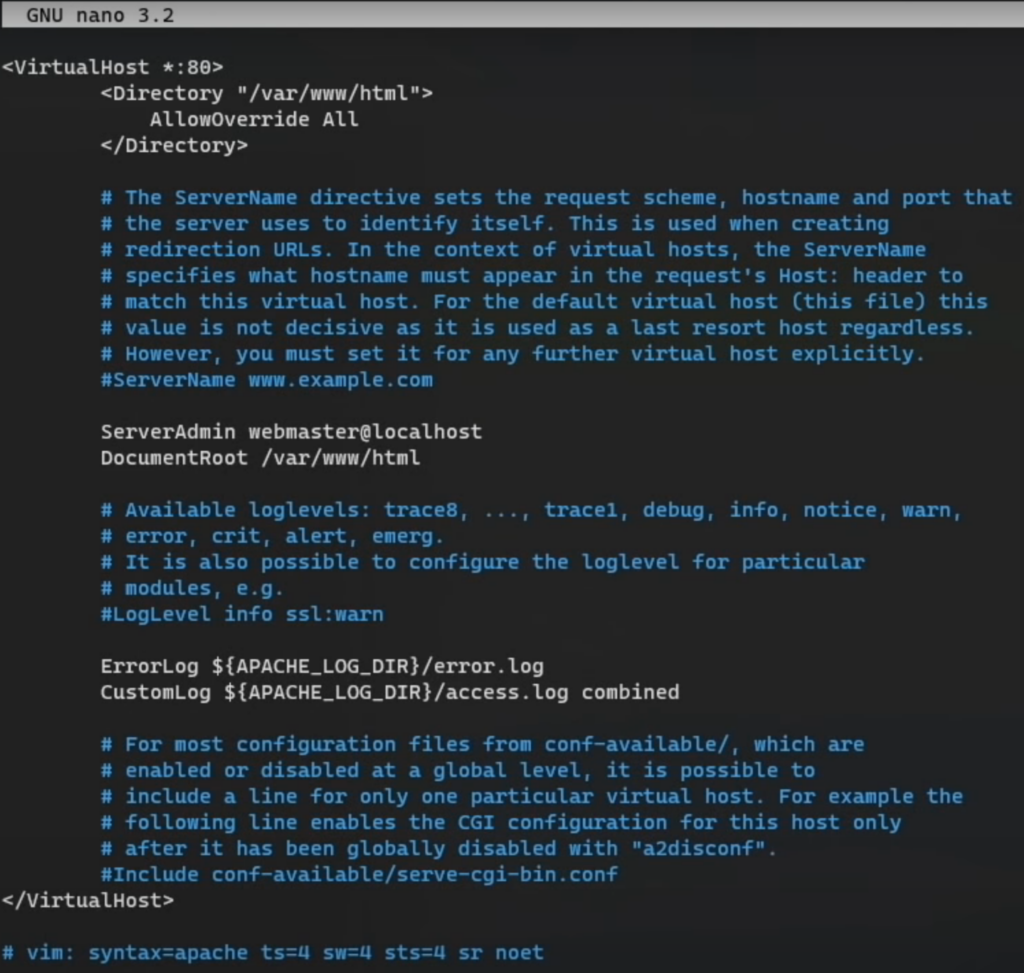
21. Ctrl + O to Write Out, Enter, Ctrl + X to Exit
22. Restart the Apache web server
sudo service apache2 restartSetup WordPress site
1. Open a browser and enter the IP address of the Raspberry Pi. This can be found in your Wi-Fi router app under connected devices. You should see the WordPress setup screen. Select English (United States)
2. At the below screen, enter these values. Password is the database password we setup previously.

3. Select Run the installation
4. Create a site title, username and password. Click Install WordPress
5. Login to new WordPress site.
6. Setup permalinks under Settings > Permalinks and select Post name. Save changes
Make website available on the public internet
1. Setup port forwarding on your router. This will vary by router manufacturer but in general use the iOS or Android app to navigate to advanced settings and then port forwarding.
2. Create a new port forward. Select the raspberrypi connected device and forward port 80 and port 443. Select TCP/UDP.
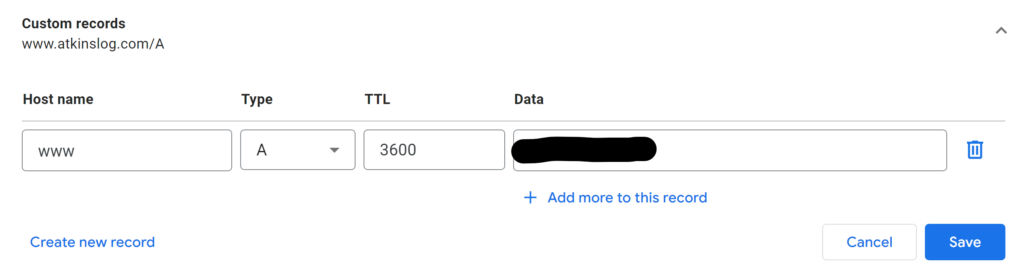
3. Register a domain name. Navigate to DNS and then Custom Resource Records. Create an A record like the below where the ip address is the public ip address, not the private one. This can be found at https://whatismyipaddress.com/
and that’s it, you’re done. All that’s left to do it build the website content and the whole world can see it.
Update
Shortly after successfully hosting this website on the Raspberry Pi, I decided to migrate hosting to AWS Lightsail because I wanted to use the Pi for other projects. The AWS hosting fees are much less than Bluehost for a small blog like this and so I feel pretty good about the switch.